A while back, we looked at how different subwoofer locations affected system performance in a Hyundai Santa Fe SUV. A client of ours asked if that information was relevant to a sedan. So, let’s take a cool little enclosure and see what happens when we try several different sedan subwoofer locations.
The Test Subject
Our goal in this experiment is to evaluate how the location of a subwoofer in a vehicle affects what we hear. We reached out to Lee Mattason at Burlington Radioactive in Burlington, Ontario. He let us use his 2001 Honda Accord for the test, lent us a subwoofer and provided room in the install bay to do the measurements. We’ve known Lee and his team for over 25 years, and he’s a class act.
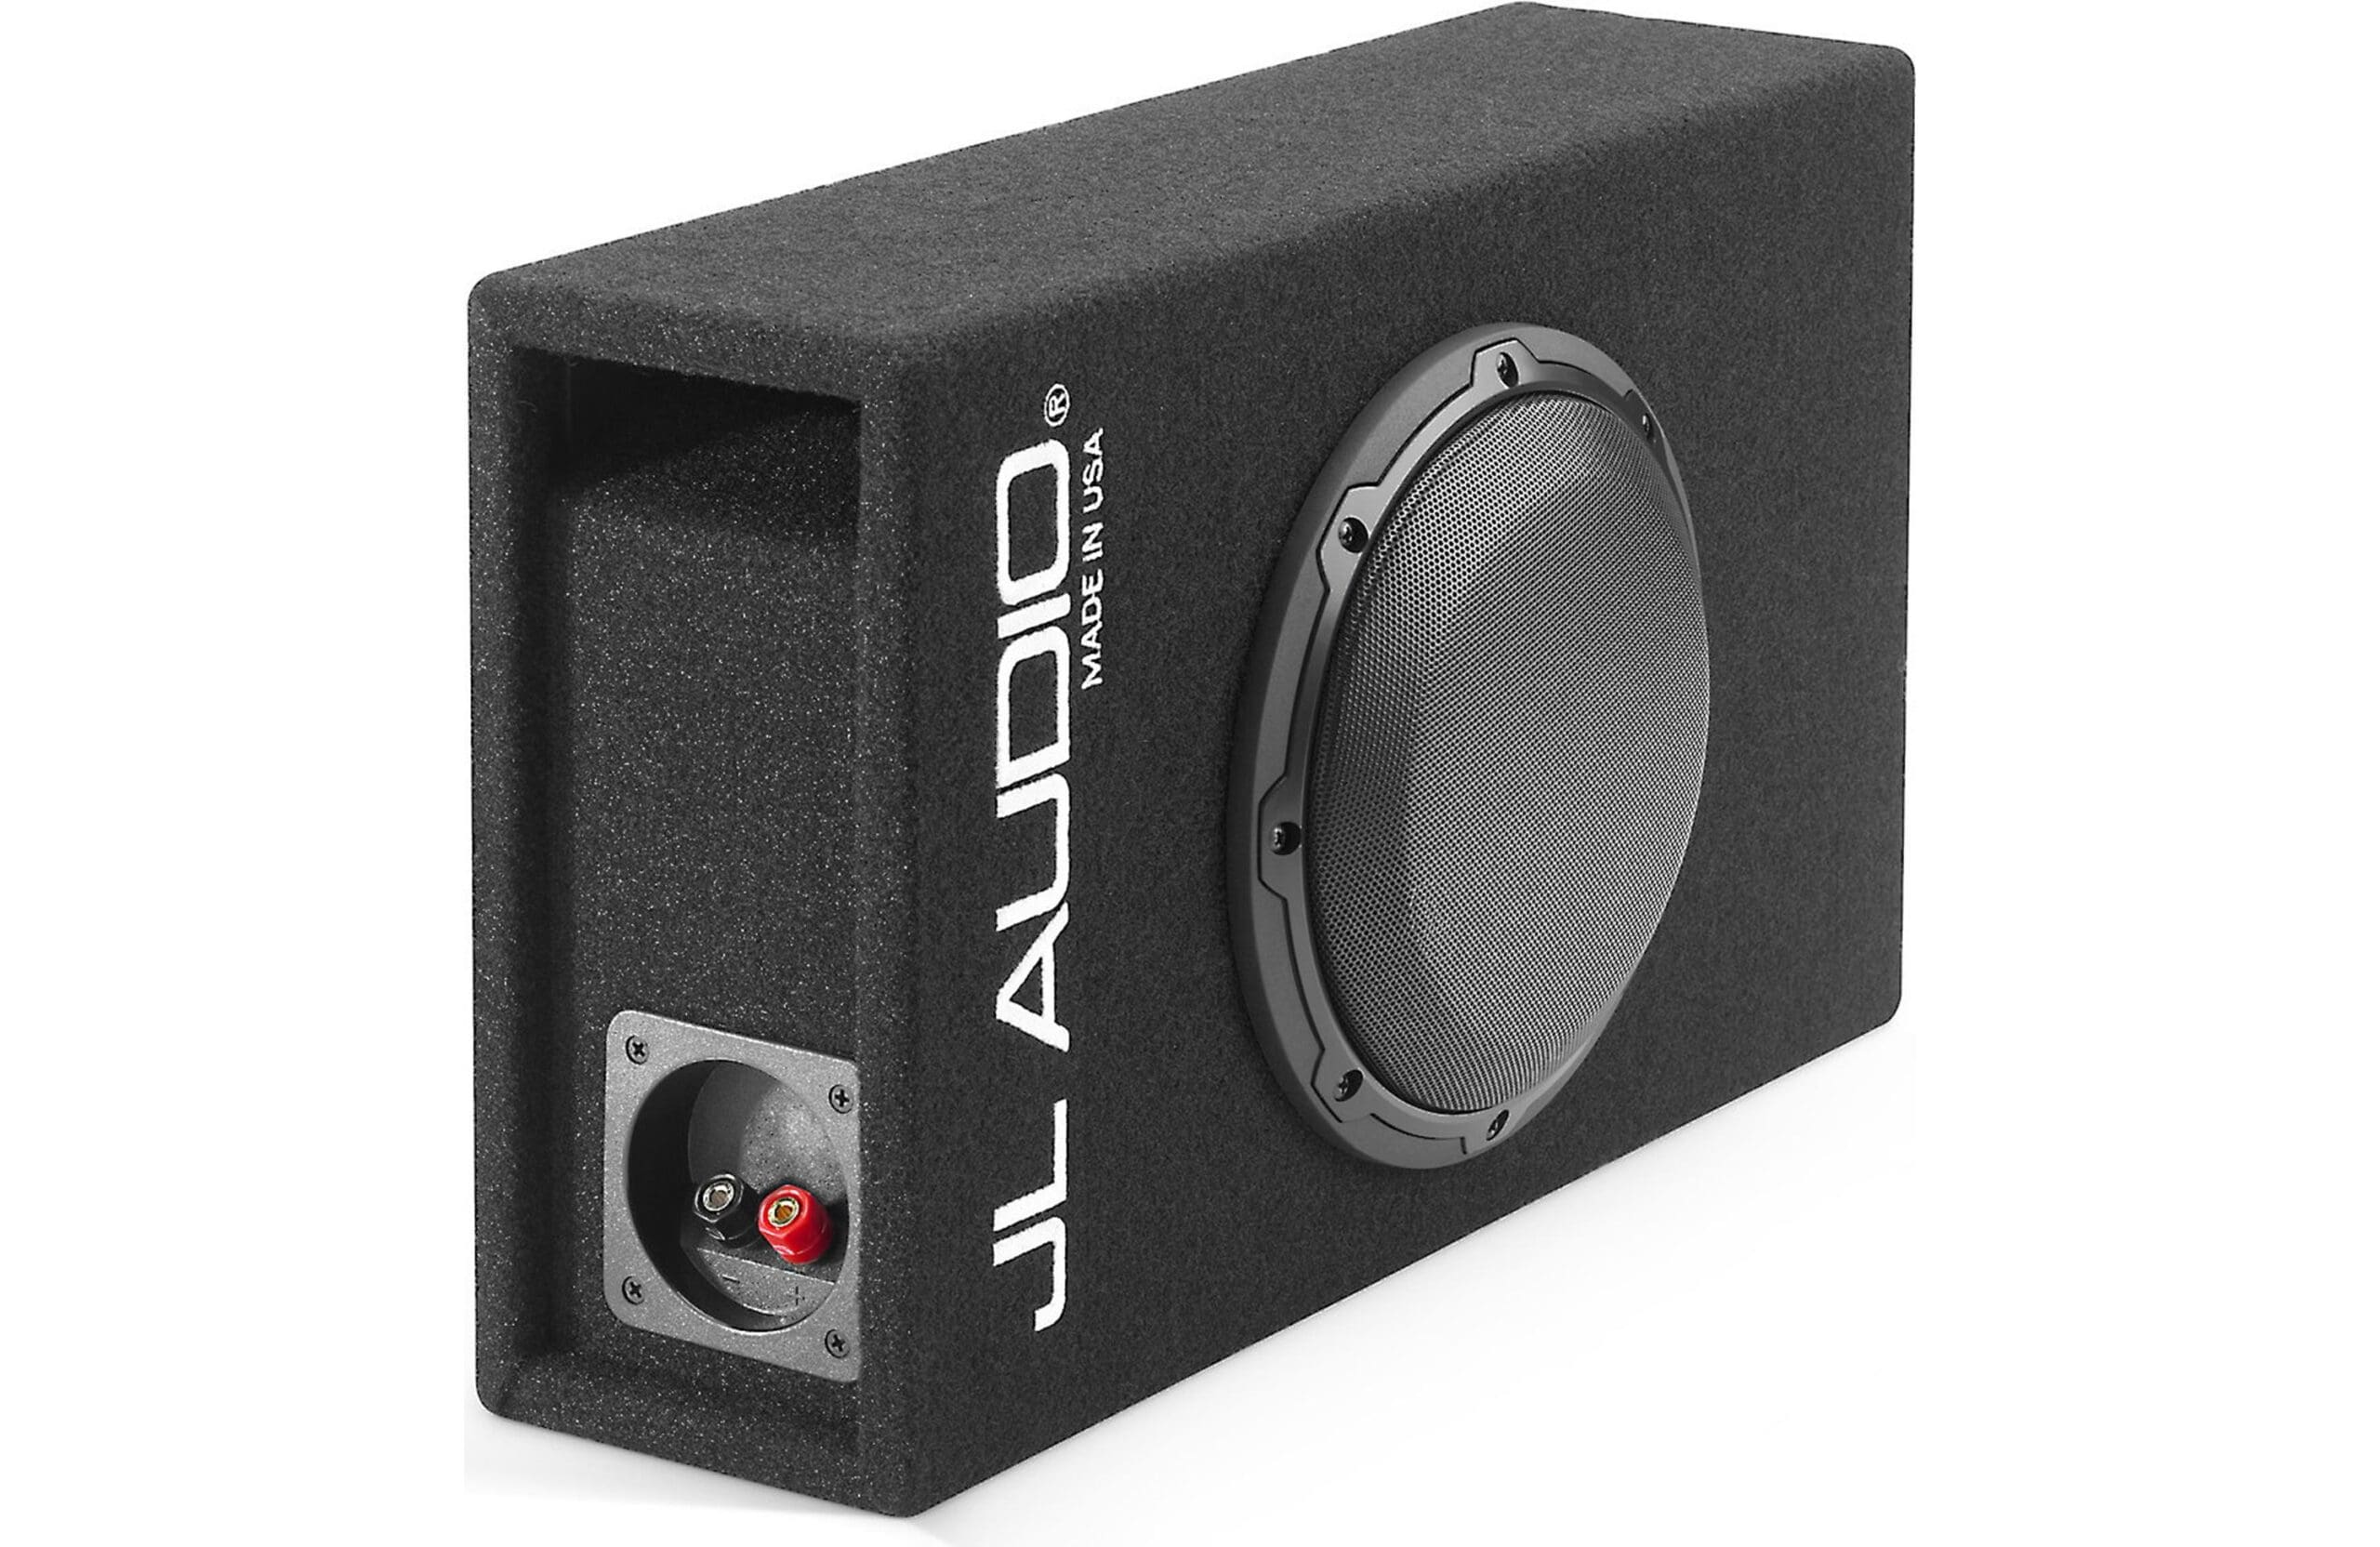
We didn’t want the size of the subwoofer to affect the measurements, so the goal was to choose something very compact. Lee had a JL Audio CP108LG-W3v3 8-inch ported MicroSub enclosure in stock. This little monster measures 18.625 inches wide, 11 inches tall and only 5.125 inches deep. The enclosure uses a 8-inch 8W3v3-4 subwoofer. The sub is rated to handle 150 watts of power, and the enclosure’s build quality and finish are exemplary. Honestly, this is a subwoofer solution we’ve been curious about. Will it play low enough for this test? Let’s find out!
The Measurement Configuration
As we’ve seen with other subwoofer enclosure systems designed by manufacturers with extensive experience in the industry, they know how to get the most out of a system by taking advantage of the transfer function of a vehicle. Before doing a complete set of tests, we took a frequency response measurement to ensure that the little woofer was suitable for the application. We set up our Clio Pocket microphone in the front seat and powered the subwoofer with a home audio amplifier. The output level was set to produce a sine sweep referenced to 6.32 volts at 60 hertz. This works out to 10 watts of power into a 4-ohm load. Here’s the first measurement we made with the sub placed in the middle of the trunk.
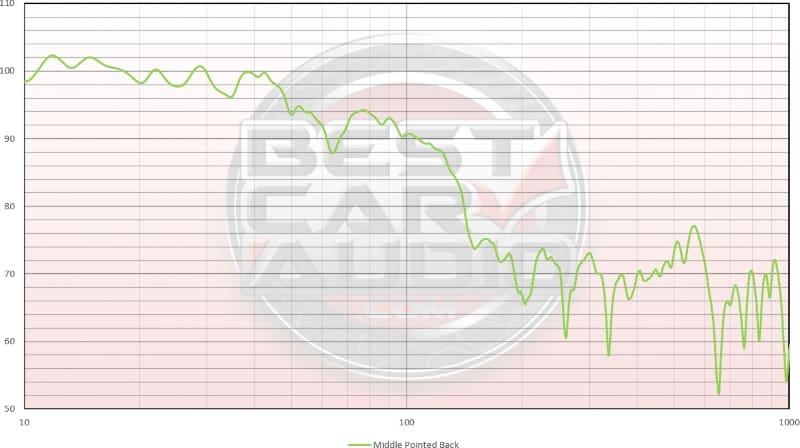
This is the first measurement of the JL Audio CP108LG-W3v3 in the trunk of the Burlington Radioactive Honda Accord sedan.
Um, what? This incredible little subwoofer measures ruler-flat to 10 hertz in the car at an output level of about 100 dB SPL when driven with 10 watts of power. Knowing it can handle 150 watts of power, it can easily produce 110 dB SPL. This is another prime example of expertise in subwoofer enclosure design and an understanding of vehicle acoustics. Sometimes, what looks “right” in a computer simulation might not transfer to in-car performance. There’s no equalization or filtering applied to this. It’s just a signal from the Clio Pocket to a full-range amp. Kudos to JL Audio; this is a little masterpiece!
Measurement Consistency
The graph above shows the subwoofer enclosure frequency response from 10 hertz to 1 kilohertz. We noted that the information below 20 hertz varied significantly during our measurement process. There is a machine shop next door to Burlington Radioactive. Whatever equipment they were using affected this infrasonic range. Sometimes the response was flat; sometimes it had a 10 dB peak at 13 hertz. We know the latter isn’t possible based on our measurement configuration and process. As such, we will leave that data out of the subsequent measurements.
Sedan Subwoofer Location Testing Round 1: The Middle
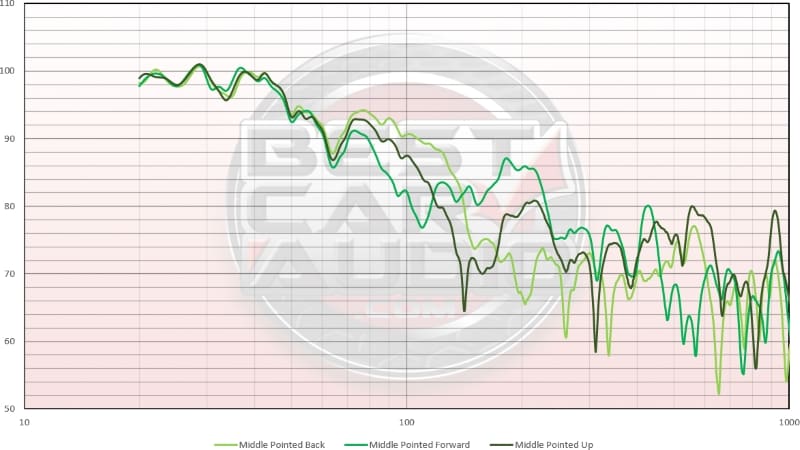
We started the testing with the enclosure in several locations through the middle of the trunk and facing different directions. The graph above, and as shown in light green in the chart below, shows the subwoofer in the middle of the trunk, standing up on its long side with the subwoofer facing rearward. The medium green trace has the subwoofer facing toward the front of the vehicle. Finally, the dark green trace has the subwoofer lying down on its back, with the driver pointed upward toward the trunk lid.
This graph will serve as a giveaway for what we’ll measure as we continue the testing. The direction doesn’t matter significantly in terms of deep bass, from about 45 hertz and down. The output levels are within a few decibels of each other. What does change is the upper bass performance around the crossover frequency. We’ll leave it at that until the summary at the end.
Round 2: To the Back!
The next three tests will have the little subwoofer enclosure placed at the very rear of the vehicle by the taillights and trunk latch. Once again, we repeated the testing with the subwoofer facing forward toward the front of the vehicle, facing upward toward the trunk lid and facing rearward toward the taillights.

Subwoofer output measurements are taken in three directions, with the subwoofer at the back of the vehicle.
The results mimic what we saw with the enclosure in the middle of the trunk. From about 45 hertz and up, the output is consistent. In this test, the upper bass output changes significantly.
Round 3: Back of Trunk
The next test has the enclosure at the back of the trunk, right up against the rear seats. It’s a long and painful story, but we lost a measurement here, so there are only two. We saw the graph of the subwoofer facing forward in this location, and it wasn’t much different than these two. I know it’s frustrating. It is for us as well. The car isn’t available to repeat the test, or we’d be on it in a flash. Sorry.
These measurements have the light orange line with the sub against the seat back and the driver facing rearward. The darker line shows the sub’s output, with it lying on its back and facing upward.
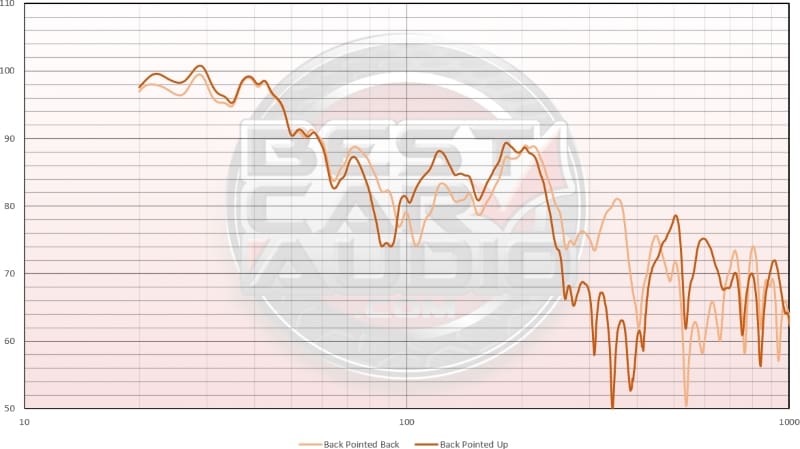
Subwoofer output measurements are taken in three directions, with the subwoofer at the back of the trunk.
The conclusion is that there isn’t much difference in output from the various measurements at this location, though up is better than backward. If we recall the measurement with the driver facing forward, it was better in mid-bass output than either. Down low, it was the same.
Round 4: Hide in the Corner
The last location we’ll measure is the right corner of the trunk. We stood the enclosure up on its long side. There are measurements with the driver facing inward toward the vehicle’s center and outward towards the fender. We also flipped the enclosure over so the vent would be facing forward toward the front of the car and at the taillights.
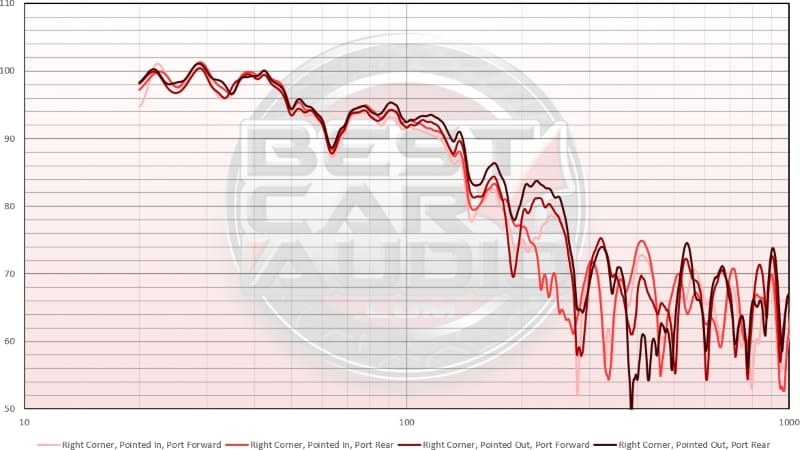
Subwoofer output measurements were taken in three directions, with the subwoofer at the back of the trunk.
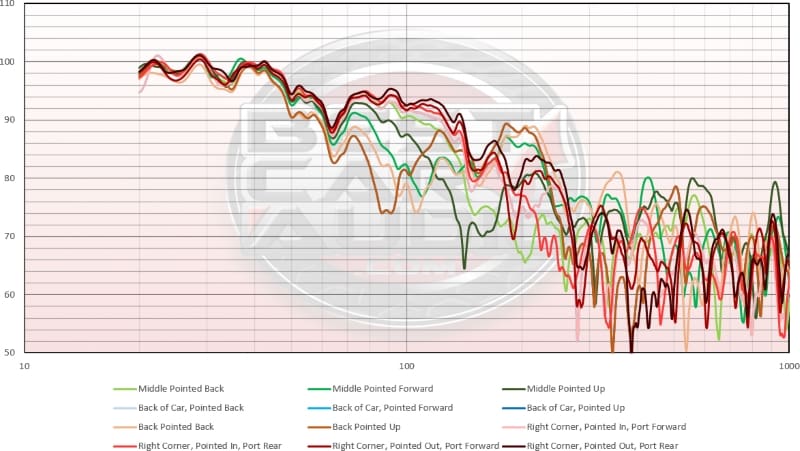
Once again, the direction changes didn’t affect this location’s upper or lower bass output. The last measurement, with the woofer facing the fender and the port directed towards the rear, would be the “best.” However, there is just a few dB SPL variance across all the measurements.
Conclusions on Sedan Subwoofer Locations
In terms of deep bass, below 40 hertz, it doesn’t matter where the enclosure is located. The graph below shows maybe 2 dB SPL of variance across all the tests.
What does change, as we indicated earlier, is mid-bass performance. When installers experiment with different locations, the process likely won’t significantly affect how much bass you hear. The difference is in the mid-bass. The best location is in the corner of the trunk, with the subwoofer pointed outward to the fender and the vent pointed rearward. In contrast, the worst location was with the subwoofer lying flat on the floor at the back of the trunk, with the woofer pointing upward. At 90 hertz, there is more than 20 dB SPL less output. The lack of midbass is typically perceived as the presence of more deep bass. These measurements show otherwise.
If you compete in SPL competitions, this data might not be transferable to that application. At high excursion levels, the vent in an enclosure can be affected by its proximity to nearby surfaces. Moving an enclosure forward or rearward by an inch can yield measurable changes. You’re looking for a peak in the response, not flatness or extension. Different rules altogether.
Yes, different vehicles might present slightly different results. However, our editor-in-chief did this test 21 years ago for another publication and found the same results. Given the variance, we’d ignore that green trace.
When upgrading your car audio system with a subwoofer, the corner of the trunk is an excellent choice. This location keeps the subwoofer out of the way when carrying cargo. It also allows access to the spare tire or a battery that might be stored under the floor. Of course, if you want to run a pair of 12-inch subwoofers, then the back of the trunk will be about the only option. Drop by a local specialty mobile electronics retailer today and ask about adding a subwoofer to your car stereo system. It’s easily one of the best upgrades you can make.
This article is written and produced by the team at www.BestCarAudio.com. Reproduction or use of any kind is prohibited without the express written permission of 1sixty8 media.
Leave a Reply